Last Saturday, at Defcon 24, we gave a talk entitled “Universal Serial aBUSe: Remote Physical Access Attacks” about some research we had performed into USB attacks. The talk was part of a research theme we’ve been pursuing related to hardware bypasses of software security. We decided to look into these sorts of attacks after noting their use in real world attacks. For example, you have “Apex predators” such as the NSA’s extensive use of sophisticated hardware implants, most notably for this work, the COTTONMOUTH devices. On the other end of the scale, we noticed real world criminals in the UK and ZA making use of unsophisticated hardware devices, such as hardware keyloggers, drive imagers and physical VPN devices and successfully making off with millions. This led us to hypothesise that there’s probably a large series of possible attacks in between these two extremes. We also noted that there’s not many decent defences against these sorts of attacks, it’s 2016, and the only decent defence against decent hardware keyloggers is still to “manually inspect all USB ports” (assuming this stuff is even visible).
And so, if we manipulate a wise man’s quote to say something we want it to say: “pentesters need to emulate real world attacks”. We’re hoping that with enough hackers equipped with these things, there will be enough “audit findings” to move the needle.
If you’re just here for the tl;dr:
- Code is at https://github.com/sensepost/USaBUSe
- Video demo is at https://www.youtube.com/watch?v=5gMvtUq30fA
Enough justification, onto the meat!
We took some fairly common attacks (fake keyboards in small USB devices that type nasty things) and extended them to provide us with a bi-directional binary channel over our own wifi network to give us remote access independent of the host’s network. This gives us several improvements over traditional “Rubber Ducky” style attacks:
- We can trigger the attack when we want. No missed executions.
- We don’t use the host’s network. No hassle on exfil, or potential for NIDS catching us.
- We can shrink our initial typed payload to just open the binary pipe. Much less fragile typing required.
- Lots of heavy lifting can be moved to the hardware, which gives less for stuff like AV to trigger on or DFIR teams to find.
- We don’t show up as a network adapter, our binary pipe is an innocuous USB device, making it harder to spot.
Lastly, we wanted this to be a working, end-to-end, attack. This means we also spent time adding some nifty features like:
- A mouse jiggler to prevent the screen saver from activating (but with no visible movement of the mouse)
- Optimised typed payloads that are partially hidden from a user within 4s, and completely hidden within 12s of their activation
- An ability to integrate your favourite payload
Prior work
Before we get into that, we wanted to acknowledge the giants whose shoulders we stood on:
* Adrian Crenshaw Plug & Pray; Malicious USB Devices & his PHUKD – Adrian did the initial work on this, and was the inspiration for the Rubber Ducky.
* Michael Ossman & Dominic Spill’s NSA Playset, TURNIPSCHOOL
Mike and Dom showed that this can be miniaturised like the NSA’s devices with some awesome work, but didn’t get to the on-host stuff.
* There are numerous projects that make use of “typing attacks” such as; HAk5’s Rubber Ducky, Samy’s USBDriveBy, Nikhil’s Kautilya or Elie Bursztein’s work (presented at BHUSA2016).
* Lastly, Seunghun Han released his Iron-HID at HITB AMS after we had submitted our Defcon CFP. It’s cool work, and a very similar idea to ours, but our implementations are very different.
Too many words, show me the pictures
Yeah, yeah, but *how* does it work?
The Hardware
We initially prototyped the attacks on April Brother’s, Cactus Micro revision 2. Think of it like a Teensy 2 with an ESP8266 stuck on it. This is still the cheapest way to get the hardware for this attack ($11).
The device has two microcontrollers, an Atmega32u4 and an ESP8266. The Atmega32u4 (hereafter AVR) gives us USB device capability using the LUFA stack. The ESP8266 (herafter ESP) is much faster than the AVR, and provides a WiFi interface, however, it doesn’t have USB support. We based our code for the ESP on the esp-link TCP-UART firmware.
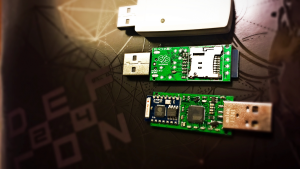
However, there are a couple of disadvantages with the Cactus Micro, and we had a new board designed by Ignatius Havemann at BlackBox . It’s open hardware, and the full specs are in the code repo. We’re currently working on plans to make fully assembled versions available. Our boards make a couple of improvements:
- They have a USB A connector so you don’t need to solder your own.
- They were designed to fit into commonly available thumb drive enclosures.
- They have a micro SD slot added for more storage
- We changed the reset switch to a hall effect sensor so it can be reset while in the case. This lets you upload new firmware.
- The I2C bus between the chips is connected with appropriate pull up resistors
- The LED is programmable
- The code works on both the Cactus Micro and our boards.
Overview
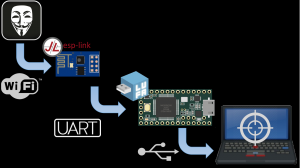
Here’s an overview of how it all fits together.
The ESP runs a modified version of the esp-link firmware. This provides a VNC server to the attacker, which is how HID events are received. The telnet interface is used to send binary data. Originally, Rogan built a Java client and custom protocol to take HID input, but soon realised that this is what VNC was designed for, and built a VNC server into the esp-link firmware instead.
The ESP is connected via UART to the AVR. The AVR is running our own firmware built on the excellent LUFA stack. The AVR’s job is mostly to be the UART to USB interface. The AVR will present itself as three devices to the host OS. A keyboard and mouse, which are used to replay HID events from the ESP’s VNC server, and a “binary pipe” device. Currently, we’re using a Generic HID device, as it has standard drivers that don’t require privileges in Windows. Other innocuous devices, such as text-only printers or MIDI devices are planned for the future. This is also where the mouse jiggler code, to prevent screensavers from engaging, sits.
Execution
On the host, a two or three stage process is run, depending on the type of attack.
- The initial “typed” payload is run. The “typing” is automated using a vnc automation tool, vncdotool. Rogan made a slight modification to allow it to read from files. Our favourite payload is the “direct” powershell payload, because it lets us do smart things to hide the window. Currently, it takes 4s for the powershell code to hide itself (set fg colour to bg), by 13s the window is moved off screen (so it still has focus for the keyboard input but is hidden from the user), and by 22s the payload has fully hidden itself and opened up the binary pipe to receive the second stage.
- The second stage no longer has size restrictions as it’s sent as a binary blob over the generic HID device. The simplest payload here just spawns a command shell on the host and sends it back to the telnet port on the ESP. There’s also a screenshot payload, which combined with a keyboard and mouse via VNC, gives you painfully slow GUI access. These payloads are pretty stealthy, the only thing written to disk is the small C# segment in the powershell that lets us import “open file” and window manipulation functionality. Even if AV were to write a signature for this, it’s small enough and innocuous enough to easily modify.
- There’s an alternate second stage, that is used to spawn a TCP to USB proxy bound to localhost, that can be used to stage other more common network-based payloads, such as meterpreter. Those payloads are sent as a third stage. We tried to demo this live, and it failed, thanks to the fact that msf’s multi/handler doesn’t like 127.0.0.1 as an LHOST. Right after the preso, @mubix pointed that out, and using a different alias for localhost makes it work, or just leaving it as 0.0.0.0. Note that this is currently limited to a single TCP connection. Once that connection is closed, the proxy terminates. A future extension would include support for multiple TCP connections, multiplexed over the single Generic HID interface.
Problems Experienced
Theoretically, this attack is nothing new. However, the gap between theory and implementation was pretty big. There were some particularly face-punching issues related to developing this sort of thing on that sort of hardware we thought we should share.
Debugging
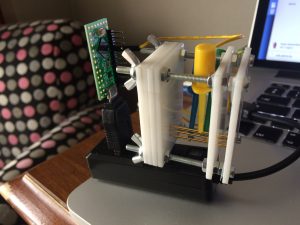
Debugging embedded hardware is painful, because there is no mechanism for persistent debug logs. The ESP’s watchdog means that any lockups, or taking too long to receive/process data, ends in the ESP hard resetting, which means your debug logs disappear. We ended up snooping on the UART between the two microcontrollers with a pair of FTDI USB-UART adapters on the Cactus Micro, where we could simply clip test clips onto the .1″ headers. On our hardware, we made sure test pads are exposed to do the same. We also built a laser-cut test jig to hold the test pads firmly in place on an array of pogo pins, and utilised a Teensy LC (which has multiple hardware UART interfaces) in place of the FTDI adapters. The Teensy also has functionality to trigger the reset on the board, for fully hands off reprogramming!
Flow control
When you are dealing with processors of vastly differing capability, flow control becomes a critical part of the equation.
The first place this was noticed was between the ESP and the AVR. The ESP8266 has a 128 byte output FIFO, and the AVR has a 1 byte receive register. The AVR is also much more limited in terms of RAM and CPU cycles, running at 8MHz to the ESP’s 80MHz. Even if the AVR sent a message to the ESP when it realised its own 256 byte receive ring buffer was half full, the ESP already had 128 bytes in flight in the UART FIFO. Simply making the AVR’s ring buffer larger didn’t solve the problem reliably, and we had to revert to making the ESP wait after every message it sent for the AVR to acknowledge it, and give the go-ahead for additional messages to be sent. There is definitely scope here for performance improvements!
This then triggered the second place. By default, the esp-link expects to be able to transmit all the data received via TCP to the UART in a single method invocation. However, by introducing flow control from the AVR, this could end up taking significant time, enough to trigger the ESP8266 watchdog! As a result, it was necessary to save the data received from the TCP connection to a local buffer on the ESP, so that it could be transmitted as and when the AVR was ready to receive it. This then required implementation of a periodic task that checked to see if the AVR was “receptive”, and then transmitted the next message from the local buffer.
Unfortunately, the act of returning from the “receive TCP data” method allows the TCP sender to transmit more data! If left uncontrolled, the sender would overwhelm the ESP as well. This made it necessary to add TCP flow control, using espconn_recv_hold and espconn_recv_unhold calls. It also necessitated allocation of a 5 packet buffer per connection on the ESP, as TCP can have several packets “in flight” simultaneously, that the ESP is obliged to accept.
Finally, the victim may want to transmit data faster than the AVR can send it to the ESP. For the Generic HID interface, this was achieved by setting a flag in a “control byte”, indicating that the AVR could not receive any more data, and that the sender should pause.
All this makes you appreciate the problems long solved by the folks that gave us the IP protocol, and those that have implemented it since then, that we no longer have to solve when working with high-level applications! Unfortunately, when working low-level, we relearn the problems of old!
Windows device naming
Following various code examples found scattered around the internet resulted in use of a device file name looking like “\??\HID\VID_03EB&PID_2066&MI_00&Col01\9&32bfc41&0&0000\{4d1e55b2-f16f-11cf-88cb-001111000030}”. This worked fine on Windows 7, but failed on Windows XP. Windows devs will likely be slapping their heads, but it took searching through the XP registry to realise that the correct device prefix should be “\\?\”, not “\??\”. Funny that the latter worked on Windows 7, though!
Foreign keyboard layouts
If you check the powershell, you’ll notice a couple of .Replace() and char[] calls, which may look weird in a payload that needs to be as lean as possible to be typed fast. This is due to differences between international keyboard layouts that we ran into, resulting in different output for the same keycode. The obvious solutions would be to use powershell.exe’s -Encrypted flag and just base64 it, but given powershell expects double width base64, it doubles the size of the typed payload. An alternative might be to use a keyboard mapping in either the VNC client or the VNC server, but that makes the payload less generic, and assumes that the attacker is aware of the keyboard layout of the victim.
Future Development
Using Generic HID interfaces for the binay pipe works fine on Windows, but will fail on Linux or OS X, as unprivileged users are not granted access to the device by default, as they are on Windows. An alternative implementation would be required for these operating systems.
Possible devices yet to be properly investigated include:
- A printer. This would depend on how significantly CUPS mediate’s access to printers
- Audio devices of various sorts. “Regular” sounds cards are likely to interfere with the user’s existing desktop setup, but a MIDI device would not – however it would be severely limited in bandwidth
- Mass storage. Read and write sectors of a very large file, although OS-level caching and device read-ahead may prove problematic, and anti-virus may interfere.
The End
Wow, thanks for making it this far, we were certain you’d drop off by flow control. The code is up at https://github.com/sensepost/USaBUSe if you’re looking to grab a copy. The release has pre-compiled binary firmware you can just flash by following the instruction in the README. If you’d like to build your own firmware, we warn you that setting up the tool chain requires some patience. We’ve added some documentation to the project, and the sub-projects have a fair bit too.
As always, everything has ben released and is under an open source license. This includes the hardware designs.


